Thoughts of Design Inspiration

Blue heart jewelry clothing trends 2016 -blue enamel hearts


Leave a comment

Making Hearts

Blue enameled copper heart jewelry

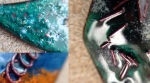
I had a big inspiration recently on creating hearts, I guess the concept of Valentine’s Day might have had something to do with it, since you start seeing hearts everywhere! Anyway, I wanted to try some new color combos in my enameling work. I use the torch method so you can’t really do as much detail with the enameling like you can in the kiln because I just dip and sprinkle, but with careful balancing act you can achieve interesting results. It all happens while dangling the piece of copper over the flame, adds to the excitement! And, you always get a unique result, so you won’t get bored with your artisan craft!
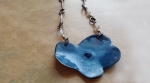
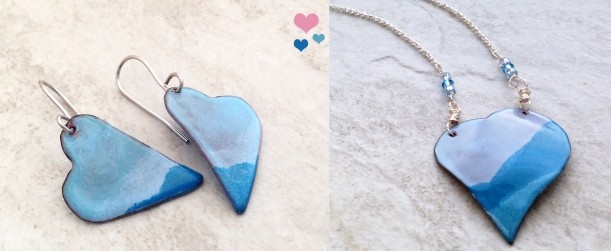
I wanted a tonal blue, so I did one with three shades of blue that I like to call “Blue Sky”. I cut the copper shapes from raw copper sheet, I like to use my own stylized heart shape. Made blue earrings to match the necklace, which is new this time, I have rarely done sets before. The other version I wanted to try was using some purple that I haven’t used in a while. I did purple with a blue center, tried to sprinkle an inside shape of a blue heart on the larger purple heart. I really like how it came out, put even some pink in there. Again, did matching earrings with the same purple and blue tones.

pippa middleton blue heart scarf

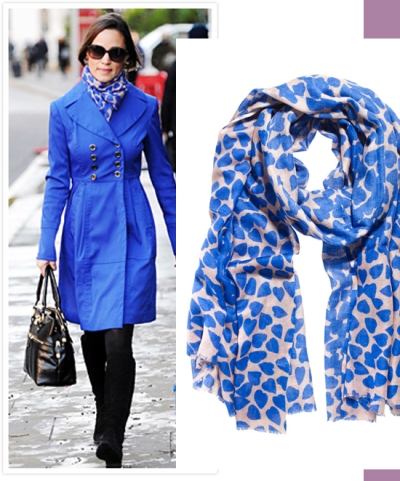
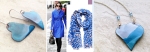
Pippa Middleton and the blue heart scarf

Purple and blue heart earrings - enameled copper handmade at Basketofblue.com

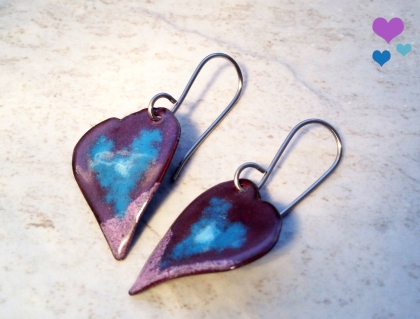
My purple and blue heart earrings

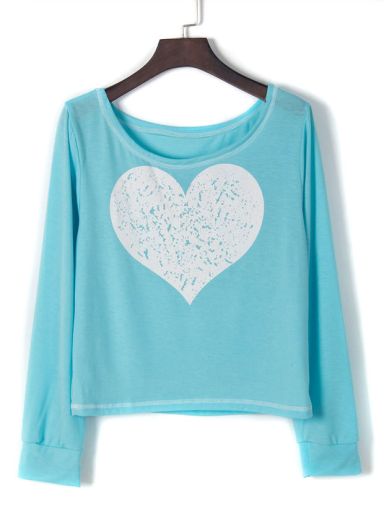
Thinking of the fashion trends this year, I did find some really nice heart prints in clothing. Even Pippa Middleton has been wearing a scarf with blue hearts on it! (It was for some good cause, and seems to be sold out.) I found a couple of nice blue heart sweaters also that I thought were really fun. Would go nicely with the blue heart jewelry! Some designers have also made heart handbags this spring. Kate Spade has a lovely clutch type bag that’s really cute. Hearts are red though, not blue. I may have to make myself a blue version!

Blue heart sweater

Fashion pictures from theoutfit.com, instyle.com and hearts handbag clutch
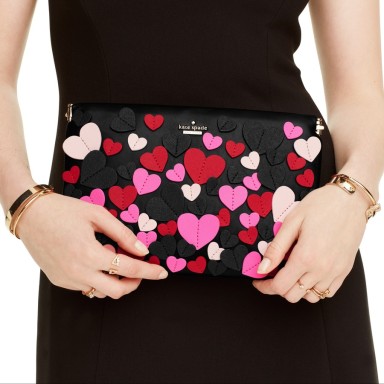
californiadreamsboutique.

enameled copper jewelry


Leave a comment

Enamel surfaces – what fun things can you melt with a torch

torch fired enamel jewelry with melted wire

Melting stuff is always fun – right? Not to talk about playing with fire. I’ve been experimenting with various substances you can melt on your enamel surface. So far I’ve tried wire, mashed up glass, enamel sticks, other bead chips. Not sure where the limits might go, but it sure creates some interesting effects!

torch fired enamel jewelry with melted wire

Wire sprinkles on this enameled piece with transparent green enamel

Of course it can be a bit tricky to get these things stick while you have a torch going and one hand is busy holding your steel rod (where your copper piece is dangling). The power from the torch is like a wind that makes your piece move constantly so getting something on top of it can be challenging. The mashed up glass you can sprinkle on, with copper tube you can roll the hot tube in it, which is great. I think the hardest to get the way you want them is shapes of wire, they go and blow away real easy in the “wind” of the torch. Also, your piece you are trying to adhere it to is often curved and the wire will just slide of. So, yes, it’s a balancing act, luckily no acrobatics involved!

enamelsurfaces4

Melted thin enamel stick

enamelsurfaces5

Smashed up glass beads, use that hammer!

enamelsurfaces2

Smashed up glass in very small bits with transparent enamel on top.

torch fired enamel jewelry

Sometimes you may get an eye…


I find that my favorites are the wire coils and smashed up glass (they call it frit if you go buy it in the enameling universe).  I imagine you can buy some really nice even shaped frit, but I find that I like my own smashed up stuff better. It gets more interesting and doesn’t always work (which is part of the fun). Some glass bead chips don’t melt, or you might have smashed something that is not exactly glass. Also, using transparent enamel can make it even more interesting because of the see through effect, and you can keep layering it on. The copper wire I use gives out a nice smoke when it gets torched and you can end up creating some nice flame patina on it, too. It is the hardest to make stick, your copper piece has to be hot enough and your arm very steady. Plus you want just enough enamel to adhere it properly but still keep the surface texture.

I will keep experimenting, no two pieces are never alike. That’s the best fun of using the torch!
You can find more items on my website: www.evadesigns.us

sign up on email list

torch fired enameled copper by evadesigns - evädesigns


Leave a comment

Torch Fired Enamel Fun

torch fired enamel copper by evadesignsThe darn winter here in Maine took me out of commission for a bit from enameling, hammering and all the fun! Yes, too much shoveling wears out your arm. Anyway, I finally got it back enough to be able to do some copper work. I can’t wait!

I was super happy of my results. I think I have discovered a bit more technique, and acquired a bit more courage to try my own things. I am really into this melting copper wire on the enamel right now, you can get some really interesting results (or, a total failure is possible, too…) I’ve tried different swirls and even  what I call “metal rain” – just cut a lot of little pieces and sprinkle!
torch enameled copper by evadesigns - jewelry, enameled earrings

And yes, then there are the poppies, I have become a poppy maniac. I quite weirdly got the inspiration on this color scheme of blue and turquoise by looking at a bunch of laundry…crazy, right? The laundry was sitting on the floor and it was a shirt and a fleece coat and the color combination was just marvelous. “That would look great in enamel” and there I go.  You can get inspiration everywhere – even in your laundry! This poppy color is quite awesome, I am so excited about it. I really hope I can make somebody else as excited about it as well! It certainly catches the eye. I will be making many and many of these.
I have tried to master this “two prong” technique, since I’m drilling two holes in my poppies. So far, better that I expected. I haven’t dropped or anything. It does take some more torch firing enamel on copper by evadesigns torch firing copper poppy by evadesignsconcentration and a bit of planning, and your enamel needs to be deep enough so you can dip the two prong into it. This reminds me that I do need to get some more metal containers for my enamels that are deep and rather narrow. It just works better.

Hope you can experiment, too. There is an endless learning curve with this stuff and that does keep it interesting, I’m hoping forever!pper by evadesigns - jewelry, enameled pendant poppy


sign up on email list

blue poppy enameled copper jewelry by evadesigns


Leave a comment

Copper Component Inspirations

Blue enameled copper poppy

Blue enameled copper poppy

I promised to share what I’ve made so far inspired by my last visit to the Bryn Athyn Cathedral. I went nuts about the golden poppies in the stained glass window – so mesmerizing! So, I handcrafted some poppy shapes out of copper and enameled them with a torch. I’m finishing one of them into a necklace right now. I also made components out of copper – links and such, sort of rustic and very handmade.

The blue poppy is my favorite – yes, my shape is rustic, not your most finessed poppy, but I think that’s part of the charm! The other one is wild orangish even more rustic version with bright yellow melted enamel whiskers thrown on top. Still looking for ideas of how to incorporate it into a piece of jewelry. It is going to be something sort of earthy looking!

Enameled copper rustic orange poppy

Enameled copper rustic orange poppy

My copper components were so much fun to hammer – I got really into heating copper and hammering like a mad person. I recommend that to everybody… great stress reliever. I just made these swirly links today, and showed them to my husband. He instantly said ” I see these were inspired by the railings in the cathedral”. I didn’t even realize that. Well, it’s great if you can keep the inspirations producing without even knowing!

I’m incorporating all these new rustic findings into pieces of jewelry. I have actually come up with some totally new designs that are different than what I usually make. I’m very happy with how these inspired items are coming along. So, go get inspired!

copper poppy blue enameled flower poppy by evadesigns

Blue enameled copper poppy necklace

handmade copper links

Hammered and torched copper links

Hammered handmade copper links by evadesigns

Rustic copper links

Handcrafted copper links torched to patina by evadesignsMaine

Hammered and torched copper components


Subscribe to My newsletter to be notified of sales and specials in my Etsy Shop!

torch enameling evadesigns maine


2 Comments

Three Stages of Copper

torch enameling evadesigns maine

Heating the copper with a torch using a trivet.

When I make enameled copper jewelry for some reason I always count three stages. (Well, there are really many more to the whole process.) You have a copper sheet that you cut your shapes from – file, shape, hammer, drill, sand, polish. I say you are now at stage one. Then you get all your enamels ready, your frit (I call frit any type of pieces of glass you  may add to your enamel pieces), you set up your torch and workspace (sifters to sift various amounts of enamel onto your pieces, holding agent, trivets, surfaces, tools.)

copper shapes ready for enameling to make jewelry evadesigns

Copper shapes formed and hammered.

Then if you are making large pieces (like my shells) you will be using the trivet method, not the “dangle it in the fire and dip” method. The first thing  is to counter enamel, after that’s done I think I’m at stage two.  (Counter enamel just means it’s the back side of the piece.)You get tons of firescale on the other side of the piece after counter enameling, you need to sand it off and clean the copper again. Often you actually get such wonderful looking colors that you don’t want to enamel the front side… There is such a thing as making art, even “paintings” with firing large pieces of copper. There are artists that make patterns and scenes with the fire alone.

copper jewelry evadesigns torch firing

Firescale cleaned off – aren’t the colors exciting!

So, anyway, to stage three. My stage three is the actual final enameling of the piece. It will be just the front if you are using the trivet method. Multiple layers, possibly using different colors. If you are doing your dipping method you are working on both sides together.  I do prefer the dipping, I use it whenever I can because by pointing the fire in different ways you get more variations of color just by heating the object more or less. Enamel colors have variations depending how much heat you apply to them. I find that the most interesting effects often happen with the dangly method and really playing with fire. Yes, it truly is playing with fire!

finished torch enameled copper pieces for jewelry evadesigns

Finished torch enameled pieces.

Hemp jewelry by evadesigns


Leave a comment

Hemp Jewelry Experiments – Bright and Fun

green hemp and seed bead necklace evadesignsmaineI did experiment with hemp before, but just this week I got new inspiration. First I wanted to incorporate some of my enameled copper pieces into a necklace somehow other than them being the sole item. Second since this it the “year of color” I happened to have hemp yarn in bright  green and light blue – how perfect since green is one of the big colors right now? I wanted to make it statement green (and blue), nothing lame. So I decided to incorporate bright green and blue seed beads into my hemp yarn and voila, with lots of crochet loops later it’s a necklace!

My other idea was to use some knotting and make a pendant. I used one of my round enameled copper pieces and one enameled iron bead in dark purple and blue tones. The hemp yarn is a light pink/salmon color, I went through my stashes of beads to find some individual beads that would fit the color scheme. My selection is a bit limited when it comes to the need for large hole in the bead, but I think it’s beginning to work pretty well. (still work on progress). So, now the hemp bug has really gotten a hold of me – I want to find more hemp colors, hoping to find some really bright ones for the next colorful creation!hemp and enameled copper pendant necklace evadesigns


4 Comments

Enameled Copper Pendants Inspired By Blue Hazy Sky

Enameled copper blue sky pendantI experimented enameling the pendant shapes inspired by the blue hazy beach sky (see previous post). These shapes are larger than I usually work with, but I wanted to create some new free form shapes and try something a little different.

There are limitations when you are working with a torch to enamel pieces this size, you really need a tripod. Well, I don’t have a tripod (after this experiment I am definitely getting one!), so I was holding the pieces with pliers. (Dangling them in the flame with a rod won’t work either, these shapes were too large for that.) So, the problem ended up being getting the counter side enameled properly and that’s where the tripod will come in handy. I am very happy though with my results on the front side.

Enameled copper pendant , 3 1/2 by 1 1/2 inch

Enameled 3 1/2 by 1 1/2 inch piece

bluesky3

Enameled 2 3/4 inch piece

So how did it all go down? I first designed a couple of shapes on paper that I wanted to try to enamel. I cut them from 24g copper sheet and sanded and drilled the holes. I then hammered them with my texture hammer trying to make puffy round shapes in clusters. It’s pretty close to the bubbly fuzzies in the sky, but I’m sure there is some home made tool that might make shapes that are more like the real thing. I enameled them with my torch by holding the copper pieces with pliers.  The problem ended up being getting the back side properly done. I don’t have big enough containers for my enamels to dip the whole shape in so I ended up shifting the rest of the enamel on top. I used some cat whiskers on the narrow piece (you can see them in the middle on the right side) and I kind of like the effect it created.

I want to keep experimenting with these larger shapes, get a tripod and some more colors!


2 Comments

Blue Hazy Beach Sky

bluehaze

Early morning hazy blue sky on Maine Coast

Sometimes when you are at the beach early in the morning and you look up you see these marvelous shapes lining the sky above you. It looks like a painting with soft puffs of shapely clouds. The sun just came up and is still looking hazy, the cloud cover blocking off some of the rays. It is texture and color with a great lighting effect that will certainly get your creative thinking to soar!

Other times you may catch a real pastel painting on the sky. Pink, purple, blue, even that lime shade of green in between. The green is usually the hardest to see, but you have to keep looking in order to get a glimpse of it. I have seen some really good paintings of these colors by a local artist. It’s mesmerizing.  Those colors are more reserved for the sunset though, the morning starts out with extremely powerful orange. But that’s for another post.

The blue hazy and puffy cloud sky instantly got me thinking of the blue enamel colors that I have used in a couple of pieces recently. I want to get the puffy texture of the clouds to show up, possibly hammering the copper piece first so you get enough texture on it after it has been enameled. Wish me luck – I’m still learning the powers of enamel! (In other words, it rarely turns out the way you intended, you get creations that were inspired by a certain thing but end up looking like something completely different!) Well, I believe that’s part of the fun of the whole concept of torch enameling. If you did it in a kiln you have much more control, but the making of it might not be as much fun.  I was reading an explanation about the difference of torch enameling compared to the kiln process that was very well put: ” It requires working from instinct with a sensitive observation of cause and effect. The torch oxidizes and blends the pigments, creates patterns and causes chemical reactions that do not occur with kiln firing. Firing times are intuitive and the temperature is controlled by the length of the flame.”  So, there is lots of potential for both success and failure!

bluehaze2

Color adjustments applied in Photoshop – you could really produce this beautiful texture in any color.

Pink mussel shell


Leave a comment

Pink Shell

You would think that all or most seaweed, shells, algae and so forth “stuff” that washes up on the beach here in Maine is bland colored. You image it being brown, grey, neutral, black, dark, all those colors that don’t generally inspire me. Now, on a day after a few storms when there’s a lot of that stuff washed up on the beach you go there and start looking you actually realize how colorful this stuff actually is! There is a lot of pink, red, purple, green in very interesting combinations of textures and shapes.

pinkmusselshelltopview

Pink and purple shell

pimnkseaweedsanshells

Washed up on the beach

Mussel shell with candy coating

Mussel shell with candy coating and a sugar foam!

These mussel shells have a fantastic pink coating that reflects light, some of them have red dots on white that look like candy.  In the picture above they had a a foam around them from the ocean  that looked like a light sugar syrup foam made for a dish in a professional kitchen.

These colors and shapes gave me an idea to try to replicate something similar in metal. I cut some copper, filed and sanded, then hammered it using my small wooden dapping block, and then enameled it with torch using black, peacock blue and  clover pink.

hammered enameled copper shape

My attempt on replicating a mussel – copper shape hammered and torch enameled with black, blue and pink

hammered and enameled copper shape

My second attempt on making a mussel shape out of copper, more rustic with some rough textures

I thought my attempt with this shape wasn’t too bad. Getting colors that you want with torch enameling is of course a bit of a test – you get what happens to come out.  Some more advanced enamel wizards I’m sure can bring up colors that they had in mind more precisely. If you look at the second shape, it is bigger and has a more rustic nature feel to it with dark shades of black and brown. I’m really happy with what I got so far.

You can see more samples of my copper pendants on Goodsmiths and Etsy:
https://www.etsy.com/listing/124752615/enameled-copper-pendant-handrafted-from?
https://www.goodsmiths.com/evadesigns/enameled-copper-pendant-torch-enameled-with-storm-blue-sunset-orange-and-enamel-chips

In case you want to know more about mussels I found a video featuring mussels on Maine coast on youtube.
http://www.youtube.com/watch?v=fszG9ZqDTM4

Now I never knew that there is an official definition of “beach”. Here it is!

WHAT IS A BEACH?
A coastal beach is the zone of unconsolidated material
extending from the lowest low water landward to the point
of permanent vegetation or change in topography.