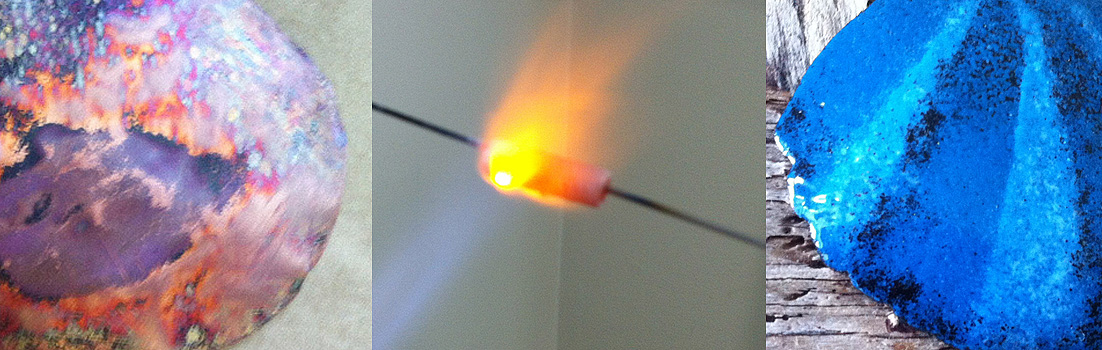

Heating the copper with a torch using a trivet.
When I make enameled copper jewelry for some reason I always count three stages. (Well, there are really many more to the whole process.) You have a copper sheet that you cut your shapes from – file, shape, hammer, drill, sand, polish. I say you are now at stage one. Then you get all your enamels ready, your frit (I call frit any type of pieces of glass you may add to your enamel pieces), you set up your torch and workspace (sifters to sift various amounts of enamel onto your pieces, holding agent, trivets, surfaces, tools.)

Copper shapes formed and hammered.
Then if you are making large pieces (like my shells) you will be using the trivet method, not the “dangle it in the fire and dip” method. The first thing is to counter enamel, after that’s done I think I’m at stage two. (Counter enamel just means it’s the back side of the piece.)You get tons of firescale on the other side of the piece after counter enameling, you need to sand it off and clean the copper again. Often you actually get such wonderful looking colors that you don’t want to enamel the front side… There is such a thing as making art, even “paintings” with firing large pieces of copper. There are artists that make patterns and scenes with the fire alone.

Firescale cleaned off – aren’t the colors exciting!
So, anyway, to stage three. My stage three is the actual final enameling of the piece. It will be just the front if you are using the trivet method. Multiple layers, possibly using different colors. If you are doing your dipping method you are working on both sides together. I do prefer the dipping, I use it whenever I can because by pointing the fire in different ways you get more variations of color just by heating the object more or less. Enamel colors have variations depending how much heat you apply to them. I find that the most interesting effects often happen with the dangly method and really playing with fire. Yes, it truly is playing with fire!

Finished torch enameled pieces.

July 1, 2014 at 2:23 pm
This is a beautiful technique, so painterly. Great results! I enjoyed seeing your other enamelled pieces on your website (especially the orange-blue tube earrings – great colour combination).
July 1, 2014 at 8:15 pm
Thanks! It’s great to hear your feedback! I’ve been making more various tube colors and also some really rustic creations with the copper. The shells are my more recent favorite and I’ve gotten some really awesome feedback on them.